Happy Halloween to all my crafty friends out there!
Just thought I'd post this cool and thrifty craft that me and my 4 year old Granddaughter "B" completed the other day for Halloween.

It's so easy, yet turns out looking so nice and only costs a few bucks to make!
I originally found this idea on a cool blog that I follow called "Mod Podge Rocks" and I "pinned" it to my Pinterest Board so I would be able to find it again later.
I was glad that I did, because when I decided to try and come up with a fun Halloween activity for my Granddaughter, this one immediately popped in my mind, as funds have been tight lately and I had remembered that this one was cheap to make!
I took a quick trip to the dollar store to get the glass votive holders, battery tea lights and Halloween napkins (Total: $4.00 w/o tax!).
I had the other supplies needed already on hand.
Here are the supplies we started with:

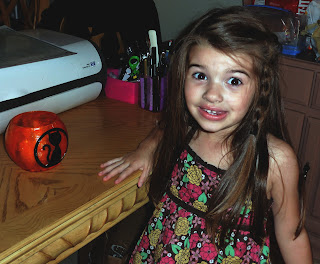
As you can see, my precious Granddaughter was very excited about getting started with our "Crafty" project.
She is such a sweetheart and brings me so much joy!
I really love that we can share crafting together!
I wanted to show a lot of pictures of her doing this with me, so that you all know that this is a craft that can be done with Children with a little supervision.
I was pretty impressed at how much of it little "B" was able to handle on her own and she was really in to it!
I am going to lightly skim over how we made these, but if you want a better, more complete tutorial check out The "Maiden D'Shade" blog post/tutorial here.
(The Mod Podge posting directed readers to the Maiden D'Shade tutorial also.)
We started out by cutting out the strips of orange tissue paper to cover the glass votive holders.

Then we mixed a little bit of water with some Mod Podge:

Next, we began gluing on the tissue paper strips with the Mod Podge:

This part was a bit tricky at first, because we tried "dipping" the pieces in the MP and placing them, but they tend to tear and come apart that way, so then we decided to just lightly glue them first with a brush...just enough to get them to lie down on the glass and then after they were all on there, we went over the entire thing lightly.
After the first coat of Mod Podge, we took them outside on the front porch to dry:


This Post/Project is linked-up to the following sites:Just thought I'd post this cool and thrifty craft that me and my 4 year old Granddaughter "B" completed the other day for Halloween.

It's so easy, yet turns out looking so nice and only costs a few bucks to make!
I originally found this idea on a cool blog that I follow called "Mod Podge Rocks" and I "pinned" it to my Pinterest Board so I would be able to find it again later.
I was glad that I did, because when I decided to try and come up with a fun Halloween activity for my Granddaughter, this one immediately popped in my mind, as funds have been tight lately and I had remembered that this one was cheap to make!
I took a quick trip to the dollar store to get the glass votive holders, battery tea lights and Halloween napkins (Total: $4.00 w/o tax!).
I had the other supplies needed already on hand.
Here are the supplies we started with:

She is such a sweetheart and brings me so much joy!
I really love that we can share crafting together!
I wanted to show a lot of pictures of her doing this with me, so that you all know that this is a craft that can be done with Children with a little supervision.
I was pretty impressed at how much of it little "B" was able to handle on her own and she was really in to it!
I am going to lightly skim over how we made these, but if you want a better, more complete tutorial check out The "Maiden D'Shade" blog post/tutorial here.
(The Mod Podge posting directed readers to the Maiden D'Shade tutorial also.)
We started out by cutting out the strips of orange tissue paper to cover the glass votive holders.


Next, we began gluing on the tissue paper strips with the Mod Podge:

After the first coat of Mod Podge, we took them outside on the front porch to dry:

(NOTE: Don't try this if it is a windy day, because obviously dirt, sand and other foreign objects could stick to the wet Mod Podge and give your project an unwanted design addition!)
We were under a little bit of time constraint, because "B" was making hers for her Mommy for Halloween and we needed to get it done kind of fast.
Putting it outside in the sun definitely helped dry it enough to get us to the next step.

"B" wanted a cat on her pumpkin, so we got out the Cricut Stuff and she picked out one from the Seasonal "Pumpkin Carving" Cartridge.
If you don't have a Cricut or would just prefer to cut out designs for yourself, Better Homes & Gardens has some great Stencils for carving Pumpkins that can also be used for this project, you just have to size them down a bit on your computer before printing them out.
Click HERE for the link to the stencils.
Sweet "B" has done a lot of "Cricutting" with Grandma, so she can actually operate it with a little help from me.

She chose the cat with a circle around it and the Cricut Imagine Machine did the work for us!

B's favorite part is "scooping" the finished product off the mat!

I sometimes have to help her a little with this part, if the design is particularly intricate, as one slip of the hand and the design can easily be torn!
She is getting pretty good at it though...an old pro!


The next step was to attach the cut-out to the pumpkin/luminary.
By now the first coat of Mod Podge had dried enough to continue.
"B" brushed on the MP to the back side of the cat cut-out:

I helped her glue it on the votive holder, as it was tricky to get it to lay flat on the rounded edges:

I had to hold it in place for about a minute or two so that it wouldn't slide around when I coated it with the MP.
Also, I had to fold and tuck under a tiny bit on each side to make it fit to the round shape.
I probably could have cut it smaller and would not have had this problem, but like I noted earlier, we were under time constraint, so I just did what I could do to make it look alright.
After adhering the cat, we covered it with a layer of Mod Podge and let it dry:

I did my Pumpkin next and just tried to experiment with something different.
I decided to try and cut out a design from a Halloween Napkin.
These are the napkins that I got at the dollar store:

I cut out the ghost with the word "Boo" on it:

Then I attached it to the pumpkin with a little bit of MP:

A bit of a warning here...go VERY easy on the Mod Podge with napkins, I was forgetting that they are a bit more delicate than tissue paper and I over-did it and made a crinkly mess out of my ghost!
Also, I put the second coat of MP on too early, before it was dry and it made the face part of the ghost too transparent, which I guess would have been fine for a ghost, if the bottom half had matched!
I didn't realize this until it had dried completely the second time, so there wasn't much I could do to fix it at that point, but at least I learned something from my experiment!
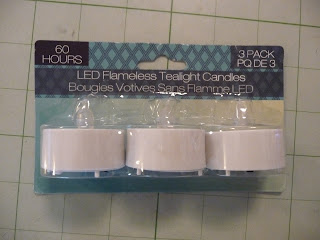
After the luminaries were completely dry, we added one LED Tealight Candle to each.
The tealights we used were purchased in a pack of three from the dollar store:

Here are the luminaries lighted:


I have to say, my Granddaughter's turned out much better than mine and I am so proud of her!
She is pretty excited about her gift for Mommy!

We had so much fun making these and I can't wait to make some more next year, or perhaps make some for Christmas!
Thank-you all for joining me and sharing in my fun craft time with my precious Granddaughter!