Wednesday, March 30, 2011

Thank-you to Amanda's Crafts & More

Several weeks ago, I was very lucky to win several blog hop gifts and one of the prizes was a group of great scrapbooking goodies from Amanda's Crafts & More Blog:


This was such a nice gift and I really wanted to thank Amanda for it, so I made her a card.
As usual, it took me awhile, but here it is finally:


I used the houndstooth embossing folder to emboss the white card and then I used the pink stamp pad to ink the raised areas of the houndstooth to give the card dimension.

I used the Mini-Monograms cartridge for the sentiment and used the shadow feature.

I wanted to add a little bit of bling without going overboard, so I added the Prima flower with the Making Memories Sabrina Blossom behind it and attached them both with a silver brad.

I added a strip of light pink ribbon to the very top of the card because after I embossed the card there was a very small area that remained un-embossed and it made the card look off balance.

Plus...it never hurts to add a little bit of ribbon!

Hope you like the card, below is the list of materials that I used to create it.

Materials/Tools List:

Cricut Mini Monograms Cartridge
Cuttlebug Embossing Folder, Houndstooth #37-1167
Pre-Folded Card, White, 5.25" x 3.625", The Paper Company
Prima Iced Got Flowers, Deep Pink, #712235
Making Memories Sabrina Mini Blossoms/Brads, #31605
Studio G Pigment Ink Chalks, Pink #VP0019
Offray Ribbon, Light Pink, 1/8"

(Sorry there is no picture of the Materials/Tools...I usually take one, but somehow I forgot to for this card)

Thank-you for visiting me!
Come back soon!


Sunday, March 27, 2011

Disney Pixar Blog Hop!

Check out this awesome Disney Pixar Blog Hop hosted by Shawn at craftychicksblog.blogspot.com and Melissa at disneydreamerdesigns.blogspot.com


There are some awesome projects and great blog candy too!
Here are just some of the goodies you could win if you join in:


Check it out...there is still time it runs until tonight (27th)
You don't want to miss out on this one!

Saturday, March 26, 2011

A New Grandbaby to Love & Spoil!

I'm very excited to announce the arrival of our 4th Grandchild...Baby C, born on Thursday, March 23rd at 9:30 am!


She weighs 6 lbs. 9 oz. and is 19-1/4" long.

I don't think I have to mention that she is absolutely GORGEOUS!!

We are beyond thrilled and feel so blessed to have her!

Hopefully I will have some cute scrapbooking layouts up soon featuring her and her big Sister B.

Thanks for checking in...Hope to have you visit here again soon!

Tuesday, March 22, 2011

Craft Haul from Oh My Crafts

Hey there fellow crafters...just wanted to share with you some great deals I got on Crictu Cartridges at OhMyCrafts.com.

Check it out!


Please excuse my un-refined video style...I'm pretty new to this and it takes some getting used to.

I still haven't got the lighting quite right or the audio, but I'm working on it.

Thanks for bearing with me and thanks for watching!

Come back and visit me soon!

Saturday, March 19, 2011

Wannabe Tim Holtz Type Card

Okay, so you might be wondering what the title of this post is supposed to mean...well I have been experimenting lately with a lot of different crafting techniques and one of my favorite craft designer's is Tim Holtz.

(I don't think I have to tell most of my visitors who he is, but if by some small chance there is a new visitor out there that doesn't know about him, you can click here to see his about me page on his website.)

So, I have been wanting to try some of his distressing techniques on my card making endeavors.

I don't know that I am very happy with how this card turned out though.

For some reason when I "distress" something...it just puts me in DISTRESS! LOL!

It never looks like Tim's stuff...it just tends to look like my cat spilled some of my art materials all over the table and it leaked onto my card!

I anguished over whether I should post it here or not, because I don't want to be embarrassed, but I have to learn, so I figured I'd post it and maybe some of my talented crafty friends and followers out there can give me some suggestions on how to make it better.

Here it is in all it's glory:


Personally...I prefer this shot I took with my iPhone Hipstamatic Camera App:


It kind of makes the card look less...uhmmm...scary, shall we say?!

One of the problems I seem to have is that after distressing the item it gets warped and wrinkled, even if I dry it with my heat tool.

I had to lay a big heavy piece of marble tile on top of this card overnight, just to make it lay down flat!

It's still not perfect as you can plainly see in the photo, but I'm hoping it's acceptable because I was hoping to send this out to a fellow blogger who's blog candy I won awhile back.

I just have to move on and consider this a learning experience, but I get so frustrated when something doesn't turn out the way I had envisioned it.

I'm no Tim Holtz for sure...maybe I should try to take one of his classes and gain some confidence in this technique.  I watched some of his videos and thought I had a good idea on how to do it, but clearly that is not the case.

Let me know what you all think.

Is it good enough to send to a friend to say "Thank-You", or is it just too darn messed up?

Here is a picture of the tools/materials I used to make this card:


BTW...in case you are wondering what the heck I did with the Copic Marker in this project, I actually colored the polyester white ribbon with it!

I never would have thought of doing this until I saw a great tip posted by my Crafty Blog Friend, Joy at www.Joyslife.com.

Here is a link to the post if you want to check it out: http://joyslife.com/color-ribbon-with-copics/

Materials/Tools List:


Folded Card, Pre-made, White, (5.25" x 3.625)
Marvy Uchida, Embossing Heat Tool
Rubberstamp, "Thank You", Stamp Craft #440D384
Tim Holtz Distress Ink, Tea dye, #T I M19510
Tim Holtz Distress Ink, Peeled Paint, #T I M20233
Inkadinkado Pigment Ink, Black, #61-30034
Clear Mini Stamp, Bird Streamer, #98868, Dimensions Crafts LLC
Clear Mini Stamp, Studio 112, Paisleys, #60-30410 

Clear Stamping Block, Studio G, #VC0028
Ranger Superfine Detail Embossing Powder, Clear, #SF J06954
3-D Floral Embellishments, Mini Flowers with Gems, Forever in time Scrapbook Collection #SE174
Beacon Adhesives, Fabri-tac, Permanent Adhesive for Fabric
Ranger Inkssentials, Mini Mister, #MIS22701
Off Ray Spool o' Ribbon, White, 1/8 inch, 100% Polyester, #CA07795
Copic Sketch Marker, #E09 Burnt Sienna
Spool Ribbon, Olive Green, Polyester, #3980, Devrian Global Industries LLC


Thanks for visiting me!
Come back soon!

Friday, March 18, 2011

Fantastic Follower Giveaway!! Stork's Delivery Cricut Cartridge!!

Amy at Love to Crop is giving away some great blog candy for reaching 100 followers!


Check it out, the giveaway is going on until March 28th.
You don't want to miss this one, this Cartridge (Stork's Delivery) cannot be bought just anywhere, it is exclusive to Creative Memories and has just been released!


St. Patty's Day Blog Hop Fun & Awesome Blog Candy!

Check out this fun St. Patricks Day Blog hop hosted by Giselle at: crossmyheartpapercrafts.blogspot.com and Nadia at: nadia's beautiful mess.


There's still time to get in on the hop and maybe win some great candy!

On one of the stops on the blog, Lisa at: http://prettypaperprettyribbons.blogspot.com/ is giving away this great candy:

So, if you get a chance...check it out.
You will see some really great projects and be inspired by all the ideas and techniques showcased!

Just click on the picture of the Lucky Pot 'o Gold to go to the beginning of the Hop.

See You There!

Monday, March 14, 2011

Another Thank-You Card

I'm really getting some experience making Thank-you cards now!

As I mentioned in my last post, over the last month I've been fortunate enough to win a few blog hops, so today I am showing you another Thank-you card I have made to send to one of those wonderful bloggers who gave me a gift!

Here is the card I made:


I made this card for Cricut Chick (Julie) who was having a great giveaway for when her blog: http://www.cricutchick.blogspot.com  reached 1000 visitors.

I was the lucky winner of the random draw and this is what I received:


The Cricut Sweet Treats Cartridge! 

I was pretty happy about that...as I didn't have this one and had been wanting it for awhile.

I even used the Sweet Treats cartridge in the Thank-you card I made. (See Supplies Below)

So, I just want to say a very big "Thank-you" to Julie (Cricut Chick) for being so generous in her giveaway, it is very much apprectiated!

Check out her blog if you get a chance, it's full of beautiful projects and great inspiration.

Here is a picture of what I used to make the card: 


Materials/Tools List:

Cricut Expression
Cricut Sweet Treats Cartridge
Cricut Doodletype Cartridge
The Paper Company Blank Cards, White (5.25" x 3.625")
DCWV Citrus Matstack Cardstock (4.5" x 6.5")
DCWV The Mariposa Cardstock Matstack (6.5" x 4.5")
Forever in Time Scrapbook Collection Mini Flowers w/Gems, (white/off-white)
ATG Tape Gun
Zip Dry Paper Glue
Therm-o-web SuperStik Permanent Glue Stick
Zig 2-way Glue, Squeeze & Roll Pen
Sakura Gelly Roll Stardust Pen, Color: Sky Star XPGB#725
EK Success Edger Punch, Daisy Scallop #54-40045

Thanks for stopping by!
If you like what you see...please follow me!


Saturday, March 12, 2011

Thank-you Card for one of My Blog Hop Wins

I have been blessed to win a few great items (blog candy) on some blog hops lately and I wanted to say Thank-you to all of the bloggers who treated me to their great candy!

This card is the first one I have completed (It's still taking me awhile to finish cards!).


I am sending this thank-you to the awesome Star at Stars Paper Passion Blog.

She was participating in the Kid's Craft Blog Hop on February 20th which was hosted by another awesome blogger: The Purple Scrapbooker Jen

This blog hop was a lot of fun because the projects were all done by children!

There really were some great projects that showed so much wonderful creativity and talent!

Even though the blog hop is over, if you'd like to check out some of the adorable projects, just click here and you can follow the list of blog sites and see them all.

I was fortunate to be the winner of Star's blog candy and this is what I won!


I was very excited about this, as I have been wanting these for a long time!
They are perfect for picking up those very tiny pieces when you are layering something small.

I cannot tell you how many times I have lost those tiny pieces because I can't get a good grip on them with my fingers and they fly out of my hand and into the vast unknown black hole...never to be found again!

I want to Thank Star and her 3 children who participated in the hop and created such cute projects!
Check them out here: http://starspaperpassion.blogspot.com/2011/02/kids-craft-blog-hop.html

Here are the items I used to make this Thank-you card:


Materials List:

Cuttlebug v.1
Cuttlebug Embossing Folder #37-1136 Bloom Dots
Cuttlebug Die 2 From #37-1116 Fruit & Tags
Lime Green Card Stock (Not sure what brand, loose stock)
The Paper Company Pre-made Blank Cards & envelopes, White (5.25" x 3.625")
Joy's Life All-Around Sentiment Stamps
Heartline (Hallmark) Stickers, Bright Flowers #JSU263M
Offray Ribbon, Satin, 1/8" Minidot Kiwi
Favorite Findings Mini Buttons #1196, Assorted
Pigment Ink Stamp Pad, Oriental Trading (assorted colors)
Glue Dots, 3/16"
Zip Dry Paper Glue

Friday, March 11, 2011

Copic Pens Craft Haul from Oozak.com

Check out my craft haul from Oozak.com, my first purchase of Copic Pens.


Many thanks to all the digital stampers and Card makers out there that have been inspiring me to take the Copic Leap.
Especially Drew Michael, from Drew Michael Designs, a very talented young man and entrepreneur.
Check out his blog: www.scrappyhappiness.com and you will be amazed!
I apologize for the bad audio at the start of this video.
This is my first stab at a blog video and I wasn't sure how to set up the camera and acoustics...so I just went with it and this is what I got!
I'm not an expert...that's pretty evident...LOL!
Leave me a comment and let me know if you've tried Copics or any other brand of coloring marker and let me know what you think about them.

Wednesday, March 9, 2011

Monday, March 7, 2011

Grandchildren Autumn Layouts

I am still working on my most recent project and have not finished so I can't post about it yet, but i thought I'd post some layouts I did in November last year while at a crop with my friend Melissa.

Hubby and I had just taken two of our Grandchildren to the local Pumpkin Farm/Patch (Bishop's Pumpkin Farm, Wheatland, California) as we try to do every year.

I just love that time of year...all the beautiful colors of Autumn are my favorite and the weather here is usually fairly mild.

Here are the layouts I made:

Fun at the Pumpkin Patch!

My Precious Pumpkins!

Autumn Fun with Poppy & Gigi!

Since I did these months ago, I can't remember all the specifics of the materials I used, but I know that I used the following Cricut Cartridges for the Lettering:

Ashlyn's Alphabet (Top Layout)
Old West (Bottom Layout)

The 12x12 paper was purchased at Green Tangerine's where we were at the crop.
It is an awesome scrapbooking store in Rocklin, California with all kinds of neat goodies and two HUGE scrapbooking rooms for crops.

I have not added any journaling to these yet, as journaling is always hard for me for some reason...I just never know where to put it and I feel like I don't write my feelings down well, like that it would sound corny or not proper.

I have to get over that and just let my creative thoughts and emotions flow!

I guess for me...the photos are the big part.
I've always been a big fan of photos and have been carrying a camera with me since about the 6th grade!
I know the emotions I feel when I look at the photos, I just have a hard time writing it down for some reason.

Maybe some of you out there in scrapbook land can help me with this...what do you do to help move your thoughts along while journaling?

Thanks for looking and if you like what you see...will you please follow me?


This post/project is linked-up to the following sites:

The Mom Creative

Sunday, March 6, 2011

Awesome Giveaway!

Check out this awesome giveaway from Pink By Design Store:

Click on the link or pictures to get more details.
You don't want to miss out on this one!

Thursday, March 3, 2011

A New Card & Happy Birthday to My Dear Friend Melissa

Whew! Finished another card...took me awhile, but I was a little bit faster this time, so I'm hoping with each additional one I will get faster!

Hubby was getting tickled that at 4:00 am this morning I was still working on it.

He probably wonders why I don't just go and buy one...but he knows how much I love to "create", so I'm sure he's figured out my insanity!

This card is a special one because I made it for my dear friend Melissa who's Birthday is today.


Happy Birthday Melissa!

Thank-you for being such a good friend to me and always being there when I needed someone.
You're awesome!

This card was supposed to be finished yesterday, so that I could mail it to her (she lives about an hour away from me) or take it to her, but...as usual, I struggled over all the little details and it took me longer than expected.

So, my blog followers will see it before the recipient...though I think I will e-mail her a link to my blog so she can see it on her Birthday!
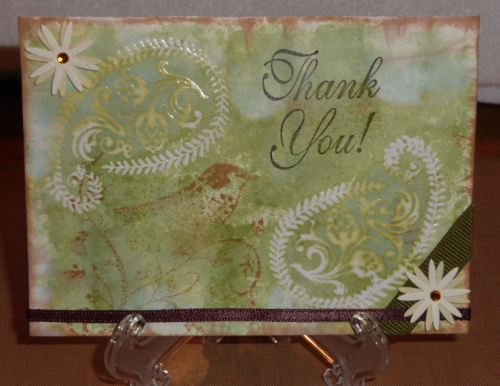
Here it is:


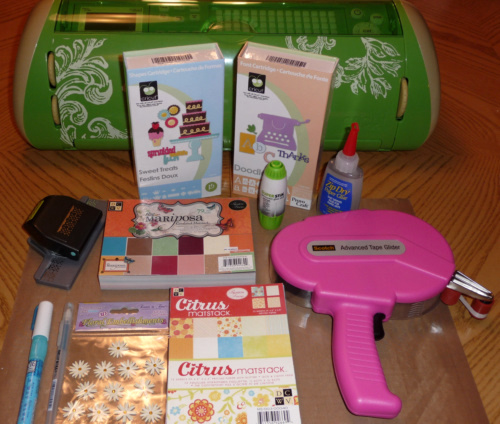
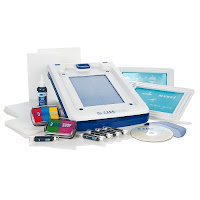
Here is a picture of the items I used to make this card:


Supplies:

Cricut Imagine
Cricut Cartridge: Kate's ABC's
K & Company Blank Cards & Envelopes, White
DCWV Adhesive Paper Prints Stack, 6"x6" (#MS-012-00003)
Studio 112 Clear Mini-Stamp (#60-30437)
Studio G i-clear Clear Acrylic Stamp Block (#VC0028)
Black Stamp Pad, Mini (Unknown Brand)
Sanford Color Pencils
Small Metal Flower Brads (Unknown Brand, but I think I got them at Target)
Wrights Baby Rick-Rack, White, 3.70m
Zip Dry Paper Glue
Kokuyo Dot 'n' Roller Adhesive, 1/3"
Zots 3-D Clear Adhesive Dots, 1/2" dia. x 1/8" thick

Directions:

I used a pre-made, white, blank card from K & Company and placed a 4 x 6 piece of patterned adhesive paper on the front.

I glued down a piece of rick-rack on the bottom edge of the front of the card.

I cut-out the teacup on page 35 of the Kate's ABC's cartridge, using my Imagine and colored cardstock.

For the sentiment background on the front of the card I cut out the square shape with rounded corners (included on the Imagine machine) at 3.0" and a smaller one at 2.8", using textured white cardstock and used the color printer feature of the Imagine to color these squares just to make things a bit faster.

The sentiment was something I just came up with, because thinking of my friend Melissa reminded me of a time when we went and had coffee together when I needed a shoulder to cry on and she was there for me!

I printed the sentiment in Microsoft Word using the Catholic Schoolgirls Intl. BB Font.

I first printed the sentiment on plain printer paper in my Lexmark X4975 Printer, then lined it up with the cut out sheet I had left over from cutting out the square shapes.

When I had it lined up properly, I put a piece of white cardstock on my Cricut mat and printed the two squares in color, but did not cut them yet.

Then I placed that same piece of cardstock in my printer and printed the sentiment onto the square, placed it back into the Imagine and then cut it out. 

This took a little trial and error before I got it just right, but I didn't have to waste any good card stock to do it, just a few sheets of cheap printer paper!

This may sound a bit confusing, but what I did basically was cut out two sets of the squares, one to act as a "template" to set-up the sentiment in MS Word and one that was actually used for the card.

Does that make sense?

It would be better if I did a video for this, but I know many other Cricut-teers out there in YouTube land have done videos explaining this, so I didn't want to be too repetitive.

I will try to find one that explains this and link it here...it's basically a way to make any Cricut machine perform like an imagine. 

I added one final piece of  "bling" (which I agonized for hours over whether I should or not!) to the corner of the sentiment...a metal flower brad.

Okay, for the Inside of the card I used some very cute stamps from Joy's Life to stamp the sentiment and a mini-stamp from Studio 112 of two girls drinking coffee for the corner accent.

I decided to color the stamp to give the inside of the card a pop of color...it seemed a bit bland without some color.

Hope you liked the card and thanks for stopping by!


Wednesday, March 2, 2011

Check out Joy's Life Create a Book Blog Today

In honor of Read Across America Day, my Crafty Blog Friend Joy is hosting a awesome blog with very talented crafters & some great blog candy!
Check it out:

Baby Shower for DIL

Well, we had the baby shower for my DIL this past Saturday and it turned out so nice!!
Thanks to K and her Sister S!
They are both so creative.
K made an adorable owl and mushroom banner out of felt, ribbon and buttons.


I gave my owl card and big sister t-shirt to my sweet granddaughter B and she loved them both!
This made her Gigi (me) VERY happy!

I even got lucky and won one of the shower game prizes:


Sweet Orange Luxurious Hand Soap and Green Tea Soap packaged in an adorable book container, with two color coordinated wash cloths!
I'm not sure where they purchased these, so the links above just take you to the manufacturer's sites.
They smell wonderful, I will have to find out where to get more!
I just love bath stuff, so I was pretty excited!