Saturday, April 7, 2012

Carnival Dresses for My Grandgirls

Since DH bought me a new sewing machine, I’ve been trying to sew a lot more and recently I had the opportunity to actually make good on a Pinterest inspiration I told my DIL I would try to re-create for her girls (My Grandgirls, B & C!)

Sweet Little “C” had her first Birthday coming up and DIL “K” told me that she was doing a Vintage Carnival/Circus theme.

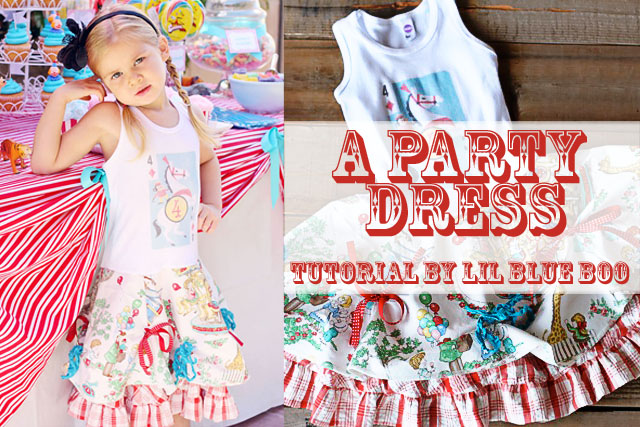
I was perusing Pinterest one late night…(Who am I kidding? I peruse Pinterest EVERY night…and day for that matter!) and I came across this adorable dress made by Ashley Hackshaw from Lil Blue Boo

(Note to Pinterest Users: This Photo is the property of Ashley Hackshaw at www.lilblueboo.com
 and is used here only for  reference purposes.
If you decide to "Pin" this photo,
please be sure to go to Ashley's blog and pin it from there:
 http://www.lilblueboo.com/wp-content/uploads/2011/11/party-dress.jpg)
I knew “K” would love it, so I pinned it to my sewing board and tagged her in the pin so she’d see it.

She really fell in love with the dress, as did I, so I told her that I would try my best to re-create it, but that I was sure my sewing skills were not up to the level  of Ashley’s!

Fortunately, Ashley sells the pattern for the skirt portion of the dress and has a tutorial on how to add the tank top and underskirt to make the finished product.
(*Update: 4/18/18 - The pattern is now sold here on Ashley's Etsy Store.)

I purchased the pattern from Ashley and was lucky enough to find the vintage crazy eights cards on ETSY and purchased those also.

I had a hard time tracking down the adorable fabric she used though, so I e-mailed her and found out it was called “To the Zoo” and she had purchased it from a store in North Carolina, called Mary Jo’s.

I found their website and called them, as I did not find the fabric on their site.

They were kind enough to search for me and finally came up with 3-5/8 yards remnant. 


I was so relieved, as I had searched “High and Low” on the internet and in stores to find that fabric or something remotely similar to no avail.

Most of the carnival/circus fabric I found was brightly colored and “K” wanted the vintage look, with the more muted colors.

I pretty much tried to re-create the dress exactly as it was on the Lil Blue Boo blog, with the exception of adding Pom-Pom fringe to the bottom of the top skirts. 


The fabric I used for the underskirt was slightly different than what Ashley used, but it was a close as I could come to it. 

I found this fabric at: Hancock Fabrics


The plain white tank tops were purchased at Dharma Trading Co., but I know that WalMart usually carries a very similar tank top to this one also, because I bought one to make a “test” dress before I made the real thing. (That’s how paranoid I was that the dresses wouldn’t turn out!) (LOL!)

I scanned the crazy eight cards I needed for the shirts and then printed them out on SuperSoft Inkjet Transfer Paper from Dharma Trading Co. and applied them to the shirts following the included instructions. 


The day before the birthday party, I did a fitting on the girls, and here is a photo of “B” modeling her dress: 


At this point, the dress was pretty much done with the exception of the bow embellishments.

“B”s dress fit perfectly, but I had to take the shirt up a bit on “C”s as the tanks were long bodied and even though I trimmed them before sewing them to the skirt, Claire’s had to be trimmed a second time and re-sewn.

Here are the finished dresses:


The girls really loved them and so did “K”!
(“B” really liked that the skirt “twirled”!)

That made me happy and I learned a lot by tackling this project, because it was a bit out of my league, but I know the more I sew, the better I will get at it.

Here are some cute photos from the Birthday Party where the girls proudly displayed their new dresses from Gigi Lisa: 


So many thanks to Ashley at Lil Blue Boo for the awesome inspiration!

And…thanks to Pinterest, because without it, I may have never found Ashley and her really neat blog!

Go check it out if you get a chance, www.lilblueboo.com not only are her projects inspiring, SHE is one of the most inspiring persons I’ve ever seen and she will enlighten you and brighten your day for sure!

Just a quick note about the project: If you decide to try it, be sure to go to Ashley’s blog and follow her tutorial and pattern instructions carefully, as she has more detailed info on this project than I have and she was very patient with me when I had a few questions during the process of making these dresses.

I hope one day to be able to do detailed sewing tutorials of my own, but I am not quite there yet in expertise and Ashley is really good at it!

Take Care Crafty Friends and thank-you for joining me today!


Monday, March 26, 2012

Carnival/Circus Birthday Invite

Well Hello There!

I bet you all thought I completely disappeared from the blogging world!

I have been hiding out doing lots of crafting and sewing, but haven't learned to juggle it all with blogging yet, so I hope you will stay with me until I get better at it!

I'm really excited to show you all what I have been working on lately and here is one of the first items I want to showcase - a Birthday Invitation I made for my Granddaughter's First Birthday!


I made this using the My Memories Suite Digital Scrap Booking program and was so pleased with the results!
I am so amazed at all the cool stuff this program does!

If you are interested in trying it out, I have a link to purchase the software in my sidebar and below this post. If you use the code you see listed there (STMMMS91285), you will receive $10.00 off your purchase!

I also purchased some additional graphic sets (digital kits) to make this invitation.

They were: 


I found the fonts for free from sites such as: dafont and fontspace and some were from the installed Windows Fonts I already had on my computer.

It was so much fun making this invitation!

When I was all done designing the invite, I uploaded it to Snapfish and then ordered 1 hour prints (5x7) to be printed at my local Walgreens.

They turned out really nice and I was lucky that Walgreens was running a 50% off on prints that day, so I received 20 (5x7) prints for $15.45!

The Birthday theme was of course old school carnival/circus and my awesome DIL "K" along with her Sister  "S" did a great job decorating:


The best part of all...was watching my sweet princess "C" eating her cake and enjoying every minute of it!


Well, that's all for now...but stay tuned...because I have more on the Birthday Party...I made some cute matching dresses for "C" and her big Sis "B" to wear for the party and that will be the subject of my next post!

Thanks for visiting me and I hope you'll return soon!
Lisa

Code: STMMMS91285

This post is linked up to the following link parties/sites:

A Crafty Soiree


Tuesday, January 17, 2012

Owl Baby Blanket

Hello and Happy New Year Crafty Friends!

I've been away for a bit but am happy to be back today with a sewing project that I'm excited about.

I made a self-binding baby blanket for my sweet Granddaughter "C".


I had purchased the fabric to make this blanket quite awhile ago and was struggling to find a good pattern or method to make it.


The fabric is like a stretch cotton knit and isn't typically what baby blankets are made of, so coming up with a good method for using both pieces of fabric without having them "separate" was tricky for me, as I am still somewhat of an amateur sewer and wasn't sure what would work.

Fortunately, my obsession with Pinterest paid off and I came across a couple of great tutorials on how to make a "Self-Binding" baby blanket.

The first one was here at Tea Rose Home Blog by Sachiko

l
The second one was here at Megan Poulton Designs


Both of these tutorials had great photos and instructions and the blankets were so beautiful but because of my lack of sewing experience, I was a bit confused and had to search for another tutorial that had a little more detailed information for sewing dummies like me! LOL!

I found this video by Googling  "Self-Binding Baby Blanket".

Melanie from "Above all Fabric" made the video and also has a set of PDF instructions to go with it.

Between the awesome photos Sachiko & Megan posted on their tutorials, and the detailed instructions given by Melanie in her video and PDF, I was able to figure out this cool blanket style!

Here is a cute picture of my sweet Granddaughter "C" with her blankie from Grandma:


She really seemed to like it and the blanket stayed together well, which pleased me because I just didn't see how that was going to work without interfacing, quilting or tying.

I didn't want any of that though, because of course for a baby, you want ultimate softness and this blanket was just the ticket for my little sweet-pea!

I am so happy to be sewing again and even though I'm not that great at it, each time I do a new project, I learn more and more and having the internet for a never-ending resource certainly has helped me out when I get stuck on a step or two!

In that vein, I'd like to give a big "Thank-you" to Sachiko, Megan and Melanie for their inspiration and wonderful tutorials they posted and made available to everyone for free!

I don't know what I'd do without helpful, giving people like them.

If you get a chance, check out their blogs and see what they are up to:

Sachiko - Tea Rose Home
Megan - Megan Poulton Designs
Melanie - Melanie Dramatic (Melanie recently sold her company "Above all Fabric" where I originally found the video and PDF).

Thank-you so much for visiting me and come back soon to see what new crafty adventure I'm on!! :)

XOXO
Lisa

This post is linked up to the following Link Parties/Sites:


Friday, December 16, 2011

Sparkle-y Christmas Ornaments!

What would the Holiday's be like without a new ornament or two!

I've always loved making ornaments since I was a young child and after seeing a clever idea on Pinterest for making some awesome glitter ornaments I was determined to make some with my precious Granddaughter B!


As I mentioned, I found this on Pinterest and the "Pin" led to the blog Everyday Cricut.

Here is the link to the tutorial which includes a good video.

You can also access the video directly from YouTube here.

In the video it shows them using some vinyl letters cut from the cricut machine, but as you will notice, we chose not to use the cricut this time, we just wrote the names and year on the ornaments using a Krylon Gold Leafing Pen.

Here is a picture of some of the supplies we used for this project:


(Sorry about the sloppy composition of the photograph...I had planned on taking a more organized photo at the end, when I knew all the supplies and tools that we used, but I forgot, so I was left with this mess!)

I also forgot to include the plastic wrap in the photo, but the video and tutorial at Everyday Cricut shows everything you will need.

These ornaments were easy to make and came out so pretty!

Even my 4 year old Granddaughter was able to perform most of the steps with just a little help from Grandma!

She picked out all the colors for her cousins and her Mom, Dad & Sister and the ribbon accents also.

She has really become my crafty little clone lately and we have so much fun!

Here are some photos of her doing some of the steps:


(NOTE: Be sure to follow the video referenced above for specific instructions, because I didn't get all the steps photographed here.)

Sweet Little B was mighty proud of the final product!


Grandma added a few final touches (the bows) which were a bit too tedious for tiny hands:


We experimented a little with the glitter, as the tutorial called for fine glitter, but just for kicks I made one ornament using regular coarse type glitter that is used for school projects and such, just to see if it would look okay and here are the results:


It still looked pretty and shiny, and really...from far away on the tree, you can't even tell the difference!

Just something to remember if you are on a budget, because the coarse glitter was much cheaper than the fine glitter, (at least cheaper than the kind that is used for scrapbooking and card projects).

I did find a multi-pack of fine glitter at Michaels (Creatology Brand) that wasn't too pricey, but the amount you get of each color was so small, you wouldn't be able to do many ornaments with it. 

Here are a few handy tips that I learned along the way while doing this project:

1. Go easy and slow pouring in the floor solution into the balls and don't squeeze the bottle, (even though you will be tempted to because of the type bottle it is), because it will go all over the place quickly!

2. If you have small funnels, use them, they are a big help in minimizing the mess, especially if you are working with a young child. (Getting the glitter in that small hole in the ornament is not as easy as it would seem!)

3. Keep a wet/damp rag handy in case some floor solution gets on the outside of the ball, you can wipe it off easily if you do it right away.

4. If you are making the these ornaments with small children, use the plastic balls instead of the glass one's called for in the tutorial, that way if little hands slip, the balls won't break and possibly injure them. (I wasn't sure if the procedure would work the same with plastic, but I tried it anyway and you can't tell the difference.  Four of the one's I made here are plastic and the rest are glass, so you tell me...can you tell which is which??!)

5. Save condiment cups and pizza box toppers (even if your Hubby makes fun of you and calls you a hoarder! LOL!). They REALLY came in handy here with this project. The condiment cups were perfect size to hold the balls while pouring in the floor solution and the pizza box toppers worked great to display the balls for photographing.

6. If you make a mistake on writing the names with the Gold Leaf Pen, don't fret...a little bit of rubbing alcohol on a Q-tip will erase the mistake and allow you to fix it! (Boy was I relieved to discover that...because I accidentally wrote the wrong name on one of the ornaments and when little B found out, she was a bit upset that I had written someone else's name on the special color ornament she had picked out for cousin "J"! I was frantic at first, because we didn't have any other balls left to decorate, therefore could not re-create the color with her name, I tried scratching it off at first and that was NOT the way to go, so I just thought I would try rubbing alcohol and it worked, yay! Crisis averted! Happy Little B!)

Thank-you for stopping by my blog and I hope you enjoyed the post!

:)
Lisa

This post/project is linked to the following Link-up Parties/Sites:


TutusandTeaParties


Saturday, December 3, 2011

A Christmas Tradition

I am so excited about this Holiday Season!

Christmas is my favorite time of year, even though things usually get pretty hectic around here during this time.

Now that all our children are grown, I often think back to the happy memories and traditions of Christmases past with them and one of my most memorable traditions is collecting Nutcrackers with my Daughter "B".

How fitting that this week's "My Memories" challenge is about family traditions!

I couldn't wait to get in on this challenge, as just last Christmas, my precious Granddaughter "B" also became very interested in the story of the "Nutcracker" after seeing a Barbie Holiday Movie "Barbie in The Nutcracker"


I was excited to share this tradition with her and immediately got out all of the old Nutcrackers that me and her Aunt had collected when she was a child.

I snapped a few photos of precious little "B" playing with the Nutcrackers and hugging them like dolls!

I even bought her one of her very own Nutcracker's for Christmas, to get her started on her own collection.

Here is the layout I created for this challenge:


(Note: if you click on the layout, you can see a larger version)

I made it using the My Memories Suite (v.3) and it was so much fun and so easy!

I just love all the options it provides and how quickly a page can be completed.

I have SO many photos and just don't have enough time to do them all in the traditional scrapbooking method everytime.

It's nice to be able to do some "digital" scrapbooking as well and get some memories documented quickly, before the photos get put on the back burner and left behind.

As you can see, these photos are a year old and I hadn't yet gotten to them to scrap in a book.

Another great thing about the My Memories Suite is that you can have your pages/albums printed professionally, so that you can have them handy to show-off to others just as you would with your traditional paper scrapbook!

If you don't yet have this awesome Digital Scrapbooking Software, you can get it for $10.00 off by clicking on the blinkie below or on the ad in my sidebar and using the discount code that is below it.


CODE: STMMMS91285

It comes with lots of great templates, backgrounds, embellishments, etc. as well as options to add other digital content.

Their site contains lots of "freebies" too and other templates and quick pages that you can buy for a very reasonable price!

The options are limitless with this software and you can create other items too, like cards and calendars.

I do need to add a disclaimer here:
I was fortunate enough to have been given a copy of this software earlier in the year to review it for the company, but I can honestly tell you that I love it and would not promote it here if I did not think it was a wonderful product!
I am amazed at what it can do for such a reasonable price and it's much easier to use than the more complicated and expensive programs such as Photoshop.

I hope you enjoyed reading about my Nutcracker Tradition and looking at my layout!

So happy you stopped by and I'd love it if you'd like to leave a comment and let me know what you think!

XOXO
Lisa


Saturday, November 26, 2011

Owl Thank-you Card for Peachy Keen Stamps Challenge 65

I have been trying to get this post up for awhile now and I apologize for the delay.

I have had some unplanned obstacles in my way this past week, including almost 3 days without Internet Service!

My provider couldn't even give me a straight answer about what was wrong and they kept promising it would be fixed "soon".

I finally gave up and figured they were stalling because of the Holiday.

Sure enough, come first thing Friday Morning (right after Thanksgiving was over!) my service was magically restored!

Oh well...it probably did me good to be away from the internet for awhile.

Another issue I had, is a bad allergic reaction to some medication I took last night.

Me & DH ended up in the ER, but thankfully it went fast and had a good ending!

They had to give me some Prednisone which really helped.

I was actually working on this post when it happened, my face began getting real hot and tingly and at first I thought my BP was up, then I finally went and looked in the mirror and almost screamed!
My face had swollen up and had big welts on it (hives I am assuming).

Thankfully, all the drama is over now and I can FINALLY get this project posted and in the challenge at Peachy Keen Stamps Challenge Blog!

Now on to my project for this challenge...


This challenge is a sketch with a TWIST!

Here are the requirements for the challenge:

Create a card OR layout based on the sketch & use

PAPER PIECING in your project!
Not sure how to paper piece? 

Using your stamps, stamp individual elements onto different papers and "piece" them together!
There's a great photo tutorial on SplitcoastStampers website - go take a peek, then check out the inspiration over at Peachy Keen Stamps Challenge Blog from their fabulous Design Team!!

Peachy Keen Stamps are not required for this challenge, 
but if you've got them, they would LOVE seeing how you create with them!
  • Project must include basic elements and layout from the sketch (feel free to flip anything!) and the twist (Paper Piecing) 
  • Project must be new, created for this challenge 
  • Link up by November 28th {the collection closes at 11:59 pm Central on 11/28} 

I really love Peachy Keen Stamps, but I have to admit that at the moment I only have the faces for the Cricut Dolls and one Easter Stamp, so I didn't actually use one of their stamps for this challenge, because I had a specific person in mind when making this card and wanted to use owls, so that is why.

But I can assure you, I will be using them soon, because they are just adorable!

If you've never seen them, you gotta go check them out!

Their "Winter Friends" Bundle is so stinkin' cute! 
It's my favorite at the moment and I'm going to have to get it!

They are having a 25% off sale on most of their items right now and 35% off on their exclusive Thanksgiving Bundles through November 28th!

Here is a collage I made of how I paper pieced the Penney Black Heart/Owl Stamp on my card:


If you've never done this technique and need a good tutorial, you can go to the SplitcoastStampers tutorial that I linked above or there is another VERY Good video tutorial on YouTube by Stamped By Hand (Joanne B) that you can see here.
You can also check out Joanne's awesome blog at: www.stampedbyhand.blogspot.com

Here is a photo of the tools and supplies I used for this project:


Recipe for the card:

White Card Stock (GP Image Plus 110 weight)
Patterned Fleur de Lis (White & Lime Green) Cardstock (From stash on hand)
Dark Red/Pink Cardstock (Colorbok - Bright , 8-1/2" x 11" Non-Textured Cardstock)
Purple Card Stock (Colorbok)
Blue, Green, Pink, Lt. Green, Golden Yellow & Brown Cardstock (Various Brands from stash on hand)
Patterned Paper, Pink/White, Gingham
Patterned Paper, Purple, Damask
Grosgrain Ribbon, Lime Green, 7/8" w, (Celebrate It - By Michaels)
Stamp, "Owl Be Yours" (Penney Black, #40-045)
Stamp, "Heartfelt Thanks" (Ditto, Studio G, #IC0098)
Pearl Brads w/Silver Lined Edge, 2 ea. (Eyelet Outlet)
Copic Multi-liner Pigment Ink Pen, Size 0.1
Glitter, Blush Rose (Recollections Signature Special Extra Fine Glitter)
Gel Pen, Orange
Pigment Ink Pad, White (Studio G)
Pigment Ink Pad, Lt. Brown (Studio G)
Pigment Ink Pad, Dk. Choc. Brown, (Studio G)
Ink Pad, Hot Pink (All Night Media)
Dye Ink Pad, Black (Inkadinkado)
Stamping Block, Pink Acrylic, 4"x6" (Apple Pie Memories)
Stamping Block, Small Acrylic, 2"x2" (Not sure of brand, but think I purchased it at "Oh My Crafts")
Water Color Sponge, Natural (Royal Langnickel)
Glue Pen, (Zig Two-Way Glue, Squeeze & Roll)
Glue Dots, Mini, 3/16"
Glue Dots, 3/8"
Zots 3-D, 1/2" (Thermo Web)
Glue Tape Runner, Small (Scotch)
ATG Glue Gun (Scotch)
Zip Dry Paper Glue
Mod Podge

Tools Used:

Paper Trimmer (Fiskars)
Bone Folder (Provo Craft)
Scissors (Fiskars)
Small Detail Scissors (Cutter Bee)
Paintbrush, Size 00 (Grumbacher)
Metal Spatula Tool, Small Flat
Toothpick


Hope you enjoyed my project and if you are inspired will join in on some of the Peachy Keen Stamps Challenges!

I have also joined a link-up party at Robin's Creative Cottage and have submitted this project/card there.

Thank-you for visiting my blog!
:)
Lisa