Tuesday, September 6, 2016

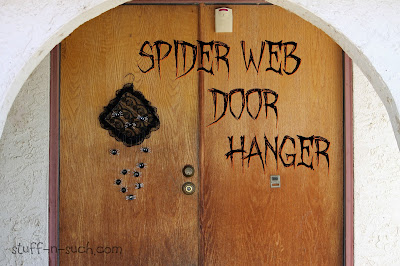
Spider Web Door Hanger For Halloween

It's hard to believe that Fall is fast approaching and that Halloween is "creeping" up on us!

Of course what would the Holiday be without a little "Craft Lightning"??!!

This awesome series has been hosted for a few years now by Angie at Country Chic Cottage and Carolina from 30 minute Crafts and it is always so much fun!

This edition is highlighting Halloween and is co-hosted by: Jen Goode from the blog "100 Directions".


I have been collecting bottle caps for awhile, just imagining all the crafty possibilities they hold...so I decided it was time to try and use some of them up before Hubby asks that inevitable question..."What are you going to do with those?" 

At first I wanted to make a Halloween-themed wind chime, but soon discovered that in order to make these babies "chime" I would need a ton of them and couldn't possibly get it done in 15 minutes or less, so I moved on to a simpler solution: a Door Hanger!


The most obvious thing I could think of that resembled the shape of the bottle caps was of course a pumpkin or a spider and I settled on spiders and a spider web!


This project was so easy to make and really the only time consuming part was taking the rubber seals out of the bottle caps. For this reason, I recommend you purchase the regular metal bottle caps that are made specifically for crafts, that don't include that seal.


If you aren't in a hurry though and you don't mind the tedious task of removing them, then by all means go ahead and recycle/upcycle!

Here is a short slideshow/video I made of how I assembled this project:


Here are the tools & supplies I used to make this project:


Supplies/Tools List:

(*Disclosure: Some text may contain affiliate links) 

Wire Clothes Hanger
Pop Bottle Caps
Cricut Cuttle Bug Embosser (To Flatten Caps)
Black Spray Paint (Krylon)
Wood Block and Nail (To punch holes in bottle caps)
Hammer
Hot Glue Gun (AdTech Dual-Temp)
Glue Sticks (AdTech Multi-Temp)
Ruler
Lace, Black (Remnant from stash...brand unknown)
Lace Trim, Black (Remant from stash...brand unknown)
Scissors
Paint Pen, Silver (Marvy/Uchida DecoColor)
Decorative Bead Trim, Plastic, Silver (Hobby Lobby)
Needle Nose Pliers
Nylon MonoFilament (aka:Fishing Line)
Metal Scribe and/or wooden popsicle sticks

Be sure to check-out all of the other Halloween Goodies in this series by clicking on the info-graphic below!

Thank-you for visiting my blog today, hope you found some fun and inspiration and will visit again soon!


(*Stuff-n-Such, Lisa Hall, is a participant in the Amazon Services LLC Associates Program, and affiliate advertising program designed to provide a means for sites to earn advertising fees by advertising and linking to amazon.com)
Thursday, July 21, 2016

DIY Sewing Cards for Kid's

It's Craft Lightning time again and this one is all about Scout Crafts!

I remember as a young girl attending Brownies and Girl Scouts was always a fun adventure and my favorite part was all the crafts we did!

These organizations always taught such good values and important skills as well.

Sewing was one of the skills I learned back then and this project is a very basic way to teach beginning sewing skills!


I first did this project with my Grandaughters a few years back, to help teach them to sew and now I am proud to say my 8 year old Granddaughter has graduated to using a sewing machine!


As you know, I love to upcycle/recycle things in my crafts and these sewing cards were no exception.

I used old cereal boxes for the cardboard and printed out cute and colorful pictures/graphics from the internet to paste on the cardboard.

I found that the pictures looked better if I used a drier type glue to adhere them to the cardboard, such as "Zip Dry" glue which is used a lot in Scrapbooking projects to preserve the integrity of the photos and not make them appear "lumpy".

I made two versions of the cards, one with small holes for older kids and one with larger (and less) holes for the little ones.


I used some washi tape to cover the edges and poked the holes using a metal scribe on the small holes and the Crop-a-Dile II from We R Memory Keepers for the card with larger holes.


My Granddaughter who was 6 at the time was able to help with almost all of the steps in this project, so I would say it is perfect for any Scout troop with children ages 6 and above!


She was mighty proud when she was done...and so was little sister!


Here are the steps for making the sewing cards:


Here are the Supplies and Tools I used for this project:


Tools & Supplies Used:

Light to Med Weight Cardboard (such as a cereal box)
Photos or Graphics printed out from the Internet
Paper Trimmer, Fiskars
Ruler
Scissors
Razor Blade (Adult Use Only!)
Glue, Zip Dry
Wax Paper (Not shown in photo above), to cover photos/graphics while drying glue with pressure
Heavy Book or Flat Weight to aid in drying glue on cardboard smoothly and firmly
Metal Scribe Tool
Crop-o-Dile II, We-R-Memory Makers
Washi Tape, Scotch Brand
Yarn (Variegated, Multi-Color)
Colored String (Variegated)
Needle, Plastic (for yarn)
Needle, Metal (for string)

Be sure to stop by the other blogs featuring these fabulous Scout Crafts that only take 15 minutes or less! 

Just click on the Info Graphic Below.

Thanks for visiting my blog, hope you will find this project useful and fun!


This project/post is linked to the following sites/link-up parties:


Thursday, May 12, 2016

Father's Day Dresser Catch-All for Dad

Time for another round of  Craft Lightning and this one is a first...a Father's Day theme!

I really had to wrack my brain for this one...I am NEVER good at gifts for men or even boys for that matter!

I guess I just typically like the "girly" stuff...but fortunately while cleaning out some storage areas on our property, I came across this old crusty tool box (carrier) that hubby was going to throw out because apparently it had outlived it's usefulness...to him anyway!

I knew that I had this Craft Lightning post coming up and I thought surely I could think of something to make from this for Father's Day...and It finally came to me...a "catchall" box for that special "Dad" in you or your children's lives.


I don't know about the guys in your life, but I know my son's and my hubby in particular are not super concerned about where stuff goes when they are tired after a long day at work!

This catch-all will help keep them organized and not lose those important items they need for the next day or in the near future.

Perfect place for a wallet, work ID badge, watch, spare change, neck ties, fitbit, and a wedding ring or other jewelry for those guys who can't wear them at their jobs!


Really the hardest part of this project was getting the old, rusty, grubby tool carrier clean!
I'll have to admit that it took a lot longer than 15 minutes to do that part alone, but of course you don't have to start with something in such bad shape...you can always use a nice wooden box purchased from your local craft store and skip the cleaning step!


I just like to re-purpose old stuff that is headed for the landfill...if I can think of a way to make it useful.


I tried to only use tools and supplies that I had on hand for this project and this time that almost caused a big craft "fail", because the spray paint I used was some paint that had been in hubby's garage stash for quite awhile and I didn't realize that older spray paints can lose their air pressure after awhile and cause spotting.


If you look closely, you can see this is what happened to my project and I started to panic, because I didn't have a lot of time to start over...but after spraying the rest of the project I started actually liking the mottled/splotched look of the paint...it made it kind of gritty looking...more like it was suited for a man, so I left it be and hoped for the best.


Here is a short video of the steps I took to make this project:


Here are the tools/supplies I used for this project:


Tools/Supplies List:

(*Some Text May include affiliate links)

Old Metal Tool Carrier/Toolbox
Primer Gray Spray Paint, Rust-Oleum
Spray Pain, Blue
Cricut Explore
Cricut Design Space (Online Software)
Plantin Schoolbook Font (DAD)
Indie Art Cartridge (Wrench)
Freezer Paper, Reynolds
Recollections Turquoise Geometric Patterned Scrapbooking Paper, 12x12
Fiskars Paper Trimmer
Scissors
Ruler, Wooden
Ruler, Plastic, Cricut
Sharpie Pen, Black
Non-Slip/Grip Material (Not sure of the brand, I had it on hand in my kitchen!)
Aleene's Tacky Glue
Krylon Workable Fixatif
Mod Podge Clear Acrylic Gloss Sealer

Thanks so much for stopping by my blog and I hope you liked my Father's Day upcycled project!

Be sure to click on the graphic below and see all of the other great projects brought to you by other creative bloggers.

Many thanks to the hosts of Craft Lightning also: Angie from the Country Chic Cottage, Carolina from 30 minute Crafts and Danielle from Busy Mom's Helper.

See ya next time!


(*Stuff-n-Such, Lisa Hall, is a participant in the Amazon Services LLC Associates Program, and affiliate advertising program designed to provide a means for sites to earn advertising fees by advertising and linking to amazon.com)


Thursday, March 10, 2016

Quick-n-Easy Collage Board

When I was a child there was nothing that got me more excited than to see paper, glue and scissors!
I knew that meant some crafty fun and what better way to create than to start with these three basic things.

That is the inspiration behind my post today for "Busy Bag", the latest edition of  the "Craft Lightning" series hosted by Angie from The Country Chic Cottage and Carolina from 30 Minute Crafts.
This edition is also co-hosted by guest blogger: Stacey with "Glued to My Crafts". (LOVE that blog name by the way!)


When I found out the topic of this version of Craft Lightning, I was a little stumped at first as my creative flow has been lacking lately because of other "stuff" going on in life...but then I remembered a draft post I started a couple of years ago, but never completed and I thought how perfect it would be for this series!

Since I babysit two of my Grandchildren, I often try to think of Crafty Fun to do with them and making collages was something I always loved, I thought it would be fun for the older Grandgirl at the time (Little B), who was 6.


I thought it would be nice to have her make something for her Momma to have at work to remind her of her girls during the day!


We started with a plain piece of cardboard and glued on some pretty tissue paper.

Then I had Little B tell me some things her Mommy liked and of course I knew of some things that my DIL liked and together we came up with ideas to include on the collage.


One thing she really likes is vintage pin-up girl pictures and I had just recently found this cool book full of pin-up photos at a yard sale. It had been partially damaged by water and I got it for practically free, so I felt like it was okay to salvage what pages were still good and not feel guilty about cutting-up the book!


We also printed out some instagram photos using my Zink printer which was really handy for this project!

The Starbucks logo and sweet little girl graphic were printed out from the internet using my Lexmark Printer.

My Granddaughter added some cute stickers and washi-tape accents and then we attached a pretty ribbon to the top for hanging.

I kept this project fairly simple so that it could be easily done by a 6 year old and be done quickly.

Even though the concept of a collage is nothing new...I think it's always timely and loved because of the thought and planning put into it. It says a lot about the person who made it and the person it is made for!


Me and my Granddaughter had so much fun making it too!
Made for some good memories for me and for her also I hope!


Here are the tools and supplies we used to make this project:


Tools/Supplies Used:

Pin-up Illustrations/Pages out of Book, "The Great American Pin-Up"
Zink Printer
Mini Personal Photos (printed on Zink Printer)
Printed Tissue Paper, Expressions from Hallmark, Lt. Purple design on White
Stickers, Tiny Crafts, Felt, Owls
Stickers, Puffy
Stickers, Me & My Big Ideas, Girly, Mambi Mini's, Words
Lexmark Printer (not shown in photo above)
Graphic of little Girl (Internet)
Logo/Graphic of Starbucks (Internet)
Aleene's Tacky Glue
Elmer's school glue stick
Stapler & Staples (to attach ribbon)
Scissors, Large Adult Size
Scissors, Kid-Safe (not shown in photo above)
Ribbon, Satin, Polka-Dot, Fuschia/Dk. Pink
Washi Tape, Tapefetti, Monster High

Be sure to stop by the other host blogs (click on graphic below) and see all the great Kid's Busy Projects you can do in 15 minutes or less!


Thanks for stopping in to visit my blog!