Monday, November 9, 2015

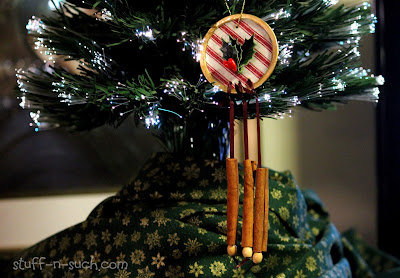
Christmas Cinnamon Stick Car Air Freshener/Ornament

The Holiday's are here and I have to say...it wouldn't be complete without the inspirational and fun "Craft Lightning" series hosted every year by Angie at Country Chic Cottage and Carolina at 30 minute Crafts!

For those few of you who may not have heard of it...Craft Lighting is a round-up of Crafts that take 15 minutes or less to make (minus drying time).

This year, for the Holiday edition Aunt Peaches joins in as a co-host with Angie and Carolina!

It gets a little tougher every year to come up with something "new" to make that hasn't been seen before...and I'm sure my project is not really new, but I have a hankering for recycle/upcycle projects using stuff I have collected (hoarded) over the years!

So I decided to make this scented Car Freshener Ornament:


I was trying to think of something different than just an everyday ornament and for some reason my car popped into my head as it's fairly new... yet has lost that "new car smell" that we all cherish so much!


So I thought how cool would that be to make a cute air freshener that could double as a Christmas Ornament!


There are other little touches you could add to this ornament to make it even better, but as I was trying to keep it at the 15 minute time frame, I didn't get too lavish!


One thing I thought of...was maybe adding a little pocket/pouch to the back of the ornament containing pot pourri or sachet scents as they are a bit stronger than just the cinnamon sticks alone.


You can also boil the cinnamon sticks to bring out more of the scent if they are older and have been sitting around awhile (like mine had been!).


When the sticks lose their scent, you can either add the sachet or a spray to it, or just use it as a pretty Christmas Ornament for your Holiday Tree!

Here is a video showing the steps taken on this project:


Here are the tools and supplies I used to make this project:


Supplies/Tools Used:

Mason Jar Lid (inside piece only)
Cinnamon Sticks, Holiday Time (Marketed By Walmart)
Small Beads, Wooden, 3 ea. (from excess stash on hand, brand unknown)
Drill, Black & Decker
Drill Bit, 1/8"
Hammer, Small, Ball Peen
Scissors
Scribe/Awl
Small Nail (for punching pilot hole for drilling)
Long Needle, (w/large eye for threading ribbon)
Toothpick (for applying glue to knots)
Ruler
Fabric Scrap (Mfr.Unknown, from Stash on-hand)
Felt, Red, Sparkle, Hobby Lobby
Embellishment, Holly Leaves, Plastic
Gold Cord
Ribbon, Dk. Red, Offray, 1/8"
Gold Leaf Pen, Krylon
Dress Marking Pencil, Lt. Blue
Sharpie Marker
Aleene's Tacky Glue
E6000 Glue
Mod Podge

Hope you enjoyed my post and be sure to visit Angie, Carolina and Aunt Peaches for more awesome Holiday Projects you can make in 15 minutes or less!
(Just click on the graphic below!)


Thanks for stopping by!

Saturday, October 3, 2015

Fall is in the Air - Popcorn Box

Every year Laura from Laura Kelly Designs hosts a great Blog Party where talented bloggers/crafters come together to create something fun from a Popcorn Box!


This is my first year to participate in this fun blog party and because Fall is my favorite season, I decided to decorate my box with that theme in mind.


I love using my Cricut Explore and immediately found some perfect cut-out designs in my library of over 100 cartridges! (Yes...I am obsessed!)

I chose the "Fall is in the Air" sentiment which is from the Autumn Celebrations Cartridge and the leaves were from the Sesame Street Seasons Cartridge.


Of course I didn't have to actually use cartridges as I have Cricut Design Space in addition to the Cricut Explore Machine, so all my cartridges are stored "digitally" in the Design Space Online Application. This is so conveinent and one of the many reasons I LOVE the Explore!

I was also sent a small goodie package for this project from Laura that contained some crafty items from some of the sponsors of this Popcorn Box Blog Party and I used some of the cute patterned scrapbook paper from "Adorn It" for the background on the front of the Popcorn Box.


We were not required to use any of these items in our project they were just complimentary from the various companies.


Here is a collage of all the steps I took to make this project:


Here is a photo of the tools and materials I used to make this project:


Supplies/Tools Used:

Cricut Explore Machine
Cricut Design Space Software/Application
Cricut Cartridge: Autumn Celebrations, Img #M35512 - "Fall is in the Air"
Cricut Cartridge: Sesame Street Seasons, Img #M38F65 - Leaf
Popcorn Box, (Cardboard) - World Market
Patterned Scrapbook Paper - Adorn-It
Various Colored Card Stock Pieces(Black, Cranberry Red, Dk. Brown, Lt. Beige) for Sentiment and Leaves
White Card Stock (for front template)
Aleene's Tacky Glue
Xyron Create-a-Sticker Machine
Precision Point Adhesive - Creative Memories
Foam Mounting Dots - 1/4", Front Porch Treasures
Pencil
Fiskars Paper Cutter
Cricut Tools - Spatula, Bone Folder, Pick
Waxed Paper
Paper Weights


Be sure to check out all of the other great projects in this party by visiting the linky below and be sure to enter the giveaway using the Rafflecopter Widget below. There are some great prizes!


Thanks so much for stopping by...and "Happy Fall Ya'll" !!


Linky Code:


a Rafflecopter giveaway

Sunday, September 6, 2015

Halloween Mason Jar Light-Up Ghost

I just love Halloween for all the crafty possibilities it brings and what better way to celebrate and showcase Halloween than with a Craft Lightning Round!

I always love participating in this great crafty collaboration with other bloggers and I am so appreciative of the Hosts: Angie from the Country Chic Cottage and Carolina from 30 Minute Crafts. For this edition of Craft Lightning there is a guest host also, Jen Goode, from 100 Directions!

So be sure to check out all of the other great 15 minute Crafts on their blogs also!

I was at a local craft store recently and saw a display of some of those popular glass blocks with lights in them and it gave me the inspiration for my project...a Spooky Mason Jar Ghost that lights up!


I didn't know how to make the mini string lights work well with a Mason Jar in the past, so I was pleasantly surprised to see this gem at my local Hobby Lobby!


It's already set up to fit a mason jar perfectly and the batteries are hidden inside the round piece that attaches to the lid!


I was pleased at the amount of light this gadget gives off considering it's powered by only a couple of AAA Batteries!


I decided to make my ghost a "girlie" ghost by adding a pretty faux fall flower.
It gave her a little flair and didn't take away from her "spookiness" at all!


Here is a video showing the steps to make this project:


Here are the tools and supplies I used for this project:


Supplies/Tools List:

Ball Mason Jar, Large, 7"
Transform Mason Jar LED Light Insert, Loew Cornell
Plastic Wrap, Sunny Select Brand
Aleene's Fabric Stiffener & Draping Liquid*
Plaid Stiffy Fabric Stiffener*
Foam Paint Brush
Scissors
Googly Eyes, Plastic, 25mm, Paste On, Darice
E6000 Adhesive
Aleene's Tacky Glue
ACE Premium Enamel Spray Paint, Antique White/Cooler Beige
Cheesecloth, Food Grade, 100% Cotton, Sew-Ology Brand
Black Felt
Faux Silk Flower, Orange
Latex or Nitrile Gloves
Empty Plastic Food Bowl

*(Note: You don't need both brands of Fabric Stiffener, but I decided to mix the two, because one was really thick and the other real thin and I happened to have both on hand)


Thanks so much for checking out my blog and be sure to click on the graphic below to see more great Halloween Crafts you can make in 15 minutes or less!


This project/post is linked-up to the following sites/link-up parties:
Across the Blvd

Monday, June 15, 2015

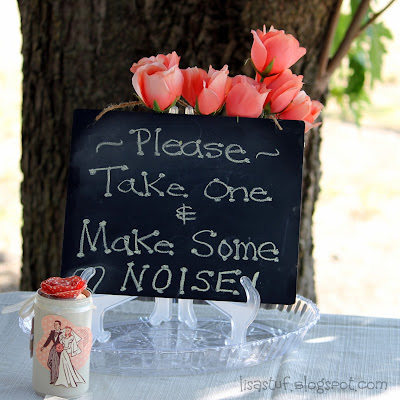
Wedding Noisemaker Favor from Soda Can

Summer is here and with it brings the wedding Season and what better time to have another round of the ever-popular Craft Lightning Series hosted by Angie at the Country Chic Cottage and Carolina from 30 Minute Crafts.

Guest host for this Wedding Series is the crafty and talented Katie, from "Sweet Rose Studio".

I'm so happy you all have stopped by to see what sweet and sassy wedding crafts can be whipped-up in a jiffy (15 minutes or less...minus drying time)!

When I think of weddings, my favorite part has always been the cute favors offered to the guests as a token of thanks and remembrance of the big day!


A tradition that is repeated at many a wedding is the celebrating or encouraging of a kiss or two between the Bride and Groom and I wanted to think of something different to signal that public display of affection besides the traditional bell.

With a little help from hubby (whose brain I was picking for ideas...), I came up with this simple noisemaker made from an aluminum soda can with bottle caps inside to create the "noise".

I wasn't quite sure how to make an old soda can look elegant (or at least appropriate) for a wedding...but I figured I'd give it the old college try and see what I could come up with.


I spray painted the can with an antique white color and bent several bottle caps in half and placed them inside the can so that it would make lots of noise when it was shook.

I sealed the can top off with a flattened out bottle cap and secured it with E6000.


I decorated the painted can using die-cuts that I made using my Cricut Explore and then accented the can with sheer ribbon and a paper flower on top.

Of course, you don't have to use a Cricut Explore or any other die-cut machine to do this, there are so many possibilities for embellishing the can but for the purpose of keeping this craft to 15 minutes or less, I decided the Cricut was a timesaver.


Here are the steps I took in making this project:


Here are the supplies and tools I used to make this project:


Tools/Supplies Used:

Empty/Used Aluminum Soda Can (Small/Mini)
Soda Bottle Caps
Ruler
Scissors
Pliers
Hammer, Small
Spray Paint, Krylon, Cover Maxx, Primer, Color: Gray
Spray Paint, Ace, Interior/Exterior, Color: Antique White/Cooler Beige
E6000 Adhesive
Scotch Advanced Tape Glider Gun
Cricut Explore Die-Cut Machine
Cricut Design Space Online Software
Newlyweds Image (#MB9501) from Cricut Cartridge (Library) "The Good Old Days"
Cricut Explore Antiquity Pen Set, Fine Point (Color: Midnight)
Sheer Ribbon, Details & Accessories, 5/8", Off White/Cream
Recollections Paper Flowers, Rolled
Recollections Cardstock Paper, Cream


Be sure to click on the info graphic below to see more great wedding projects that can be made in  15 minutes or less!


Thanks for stopping by for a visit...Please leave a comment and let me know what you think!


This project/post is linked to the following sites/link-up parties:


Home Matters Linky Party - Grab Button


Monday, April 6, 2015

Teacher Note Necklace Made from Upcycled CD

Every year I like to make a little something for my Granddaughter's Teacher for Teacher appreciation week and this year I've come up with this note necklace that is made from an old CD.

Teacher Note Necklace made from Upcycled CD-ROM

I wanted to incorporate something useful into something fun!

I noticed that the teachers at school sometime have recess or yard duty and I thought it might be handy to have this little necklace with a post-it note pad and pen attached!


I even included a badge clip so that they can easily wear their school badge with the necklace.


To personalize it for a teacher gift, I added the photo of my Granddaughter and a sweet quote/poem about teachers!


This craft can easily be done in 15 minutes (minus drying time), though I'll have to admit, I added a few more things to my version that probably made it take a little longer.

Adding the gold cord around the photo was a bit tedious as it didn't want to easily lay down in a circle.
Also, the way I attached the beaded necklace to the cd was more elaborate than you really need to get.

I was just thinking of how it might lay nicer, so I added the snipped paper clip ends and cut the necklace in half and glued it to the ends of the clips.

This of course took more time than just gluing the whole beaded necklace to the back of the CD, but I wanted to add the square post-it note which took up more room and made it harder to mount the beads directly to the back of the cd.

I started by sanding the CD lightly on the shiny side and a little harder on the colored side because I was using tissue paper to cover it and didn't want any of the writing to show through.

I cut some strips of patterned tissue paper and then cut them into oblong pieces and adhered them to the CD with Mod Podge.

I only put two coats of Mod Podge, but you can add more if you like, just be sure to allow drying time between coats.

I scanned and printed out a photo of my Granddaughter on my Epson CX7400 color printer and glued it to the center of the CD.

(Note: before applying Mod Podge to a ink jet photo print out...apply a light coat of fixative to the photo/print out first...it will prevent the Mod Podge from causing the print to run or bleed!)

I was going to make a print out of the poem on my computer, but for times sake I decided to hand write the quote using a black sharpie marker.

In hindsight...I wish I had gone with the printout, only because I have a terrible time lining up my writing/printing as you can tell from the pictures!

I even used a "template" I made from paper and pencil, hoping to get it right and I still wasn't thrilled with the results, but the message will get across I suppose and maybe it will make the gift more personable!

The note pad/post-it note was attached using double sided foam tape and the pen was attached using the clip on the pen.

I thought of using magnets for the pen, but I didn't want to add any more weight than necessary to the necklace.

This project was quick and very inexpensive to make, I found the beads, tissue paper, pen and post-it notes at the 99 cents store and of course the CD was just an old one I had laying around that I no longer needed.


Here are the tools and supplies I used for this project:


Tools & Materials List:

Old CD (Not shown in photo above)
Sand Paper
Tissue Paper
Beaded Necklace, Plastic
Post-it Notes
Mod Podge
E6000 Adhesive
Workable Fixatif
Aleene's Tacky Glue
Mod Podge Gloss Sealer
Foam Paint Brush
Wire Cutters
Foam Mounting Tape (Two Sided)
Heavy Duty Scissors (Cutco Brand)
Regular Scissors
Sharpie Pen, Black
Pen (with clip)
Pencil
Gold Cord
Cardboard
Wax Paper and/or Butcher Paper
Paper Weights
Color Printer, Ink Jet (Epson)
Paper Clips
Plastic Container (for Mod Podge) (Not shown in photo above)

I made a slideshow showing the steps I took to make this project.

You can view it here on my YouTube Channel:


Or here on my Flipagram Feed:


Thanks so much for visiting my blog!

If you want to see some more great Teacher Appreciation Gift Ideas, click on the graphic below and visit Angie, Carolina and Jessica's blogs for some awesome and crafty inspiration!


This project/post is linked to the following sites/link-up parties:

Skip To My Lou